Sewing Machine Accessories: How a Magnetic Seam Guide Works
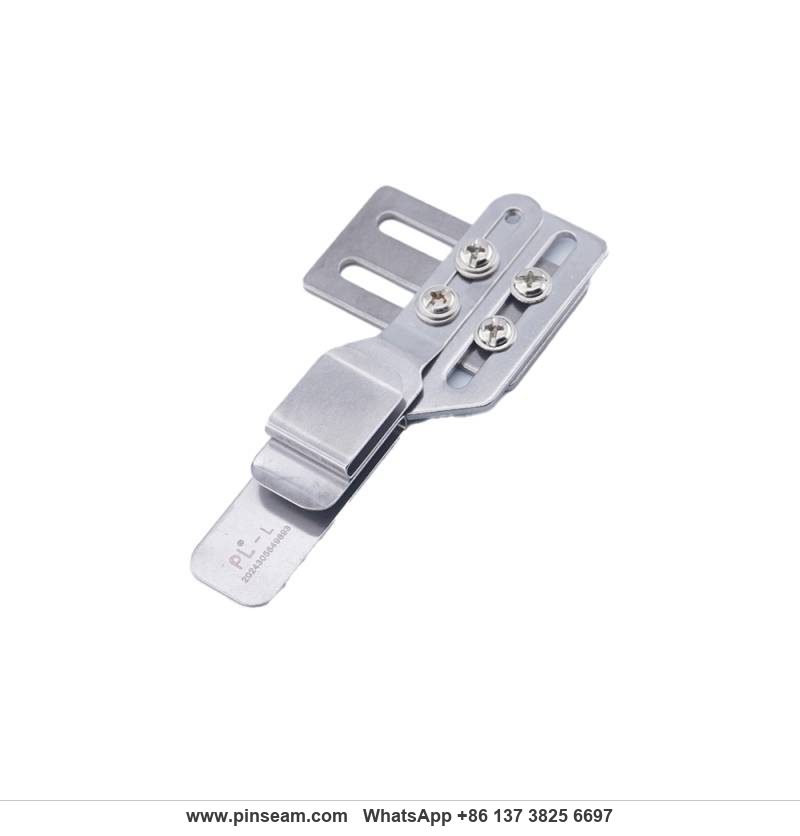
This article explains the internal structure and working principle of a combined cuff, placket, and waistband gauge set for single-needle lockstitch machines, including the second-generation PL (Professional Leader) upgrade (item 1688-0663). It covers setup numbers — presser foot pressure in kgf, feed dog height in millimetres, magnet pull force in kilograms — and adds a full troubleshooting matrix that maps visible defects to concrete corrective adjustments. The focus throughout is on mechanism and structure, not on brand promotion.
Related guide: magnetic seam guide — types, fitting and machine compatibility.
Why Edge Control Is the Real Bottleneck in Cuff and Placket Work
In a garment factory, the operations that slow a line down are rarely the long straight seams. They are the short, fussy ones: attaching a cuff to a sleeve, setting a sleeve placket, joining a waistband, or folding a front placket. Each of these requires the operator to hold a folded edge at a constant width while feeding two or three layers of fabric under the needle at a steady rate.
Doing this freehand depends almost entirely on operator skill. A 1 mm drift in fold width shows up immediately as a wavy cuff or a placket that will not sit flat after pressing. In batch production, the variation between operators becomes the variation between garments.
The usual answer is a folder or a gauge — a metal or plastic guide that mechanically constrains the fabric edge. Traditional single-function folders solve one operation each. A factory running cuffs, plackets, and waistbands therefore keeps three or four different attachments on the bench, and changeover time eats into the shift.
The combined gauge described here takes a different approach: one bracket-mounted body carries several guide elements that can be used in different configurations. The second-generation version reworked the fabric channel and the pressure tongue, which are the two parts that determine whether material feeds smoothly or jams.
How the Gauge Works: Mechanism and Internal Structure
The Three Functional Zones
Although it is sold as a multi-function attachment, the working principle breaks down into three distinct zones. Understanding them separately makes setup far easier, because each zone has its own adjustment and its own failure mode.
- Edge folding zone. A curved entry channel rolls the raw edge of the fabric inward. The radius and the entry angle determine how much the fabric turns. A tighter radius produces a narrower fold; a longer, gentler entry reduces the chance of the edge catching on itself.
- Positioning zone. An adjustable stop plate or fence sets the distance between the folded edge and the needle. This is the part that fixes seam allowance width. On the second-generation unit, the stop is a slotted plate rather than a fixed tab, so width can be set continuously instead of in steps.
- Joining and feeding zone. A pressure tongue holds the folded layers down against the bed plate as the feed dog pulls them forward. This zone is where most jamming happens if the tongue height is wrong for the fabric thickness.
What Changed in the Second Generation
The first-generation version of this type of gauge worked, but two complaints were common. First, the entry channel had a relatively abrupt lip, so light or slightly stiff fabrics would catch on it. Second, the pressure tongue was a single flat spring, which applied the same force regardless of how many layers passed underneath.
The upgraded version addresses both. The entry lip is now a longer taper with a polished transition, and the tongue has a slight pre-load curve so it lifts progressively as fabric layers build up. In practice this means the operator needs less manual assistance at the entry point, and the gauge tolerates small variations in fabric thickness without readjustment.
These are modest changes, but in a production setting modest changes matter. Any reduction in the number of times an operator stops to clear a jam translates directly into output.
Specifications, Materials, and What the Numbers Mean
Frame and Guide Materials
The body is normally a stamped or machined metal bracket — commonly stainless or nickel-plated steel — with engineering-plastic guide inserts. The metal frame carries the mounting load and resists bending over years of use. The plastic inserts provide a low-friction surface where fabric actually contacts the tool.
This split matters when you evaluate a replacement. A gauge with an all-metal channel will wear the fabric surface over time if the channel is not polished, and it will transfer more heat from friction. A gauge with an all-plastic body will flex under load and lose its width setting. The hybrid construction is the practical compromise.
Adjustment Ranges and Reference Values
Exact figures vary by supplier, but the working ranges on this class of gauge are broadly similar. The list below gives the values to work from when setting up or specifying.
- Fold width: approximately 6 mm to 20 mm, set by the entry channel geometry and the stop plate position.
- Seam allowance offset: adjustable across the slot length, typically covering the common 6 mm, 10 mm, and 12 mm allowances used in shirt and trouser construction.
- Channel exit clearance to needle: 2 mm to 4 mm. Below 2 mm the needle risks striking the channel exit; above 4 mm the fabric can twist between the guide and the needle.
- Fabric thickness: light to medium-heavy, roughly 80 g/m² to 400 g/m², depending on presser foot pressure and feed dog height settings.
- Mounting: machine screw through the bed plate or a magnetic base, depending on the specific bracket supplied.
Presser Foot Pressure: Working Numbers
Presser foot pressure is measured on the machine's regulator spring, usually in kilograms of force (kgf) or in numbered steps on a dial. These are the practical starting points for a lockstitch machine running a channel gauge:
- Light fabric (80–150 g/m², shirting, lining): 1.5–2.0 kgf. Lower pressure lets the fabric pass through the channel without being stretched.
- Medium fabric (150–280 g/m², poplin, poly-cotton twill): 2.0–3.0 kgf.
- Heavy fabric (280–400 g/m², denim, canvas): 3.0–4.5 kgf. Below 3.0 kgf the feed dog will slip on multi-layer cuff joins.
These are starting values, not absolutes. The test is simple: run a scrap piece and look at the stitch. If the fabric is puckering behind the needle, pressure is too high. If the stitch length varies or the fabric stalls at the entry lip, pressure is too low.
Feed Dog Height: Working Numbers
Feed dog height is measured from the top of the feed dog teeth to the needle plate surface, with the presser foot raised. Measure with a steel rule or a depth gauge.
- Light fabric: 0.7–0.8 mm above the needle plate surface.
- Medium fabric: 0.8–1.0 mm.
- Heavy fabric and multi-layer joins: 1.0–1.2 mm.
When a gauge is fitted, the fabric path is longer and more constrained than in freehand sewing, so the feed dog has to do more work. If the feed dog is set at the light-fabric height while running a three-layer waistband join, the gauge will appear to "jam" — the real cause is insufficient feed. Raise the feed dog before adjusting the gauge.
Magnet Pull Force: What to Look For
If the bracket uses a magnetic base, the holding force is the specification that matters. In practice, a magnet base for a sewing gauge should provide at least 8–12 kg of vertical pull force on a clean, flat steel bed plate. Below 8 kg, machine vibration at 4,000–5,000 rpm can shift the base, and a shift of 0.5 mm is enough to change the seam allowance visibly.
Two conditions reduce effective pull force and are often overlooked:
- Surface condition. A film of oil or lint between the magnet and the bed plate can cut holding force by 30–50 percent.
- Plate material. Magnetic bases hold on steel and cast iron. They will not hold on aluminium or composite tables, regardless of rated pull force.
For a machine that runs the same operation all shift, a screw mount is more repeatable. For a machine that changes operation several times a day, the magnetic base is faster to reposition and the pull force figures above are the threshold to check.
Why the Mounting Method Matters
A screw-mounted bracket is rigid and repeatable. Once set, it does not move unless the operator loosens it. The trade-off is that it requires a threaded hole in the machine table, and not every table has one in the right place.
A magnetic base avoids drilling and can be repositioned in seconds. This is where a magnetic seam guide earns its place in the toolkit. It holds the bracket firmly on a steel bed plate, allows quick repositioning between operations, and can be lifted off entirely when the gauge is not needed. The limitation is that it will not hold on aluminium or composite tables, and heavy vibration at high speed can shift a weak magnet.
Note that the magnetic base and the screw mount are not mutually exclusive. Some brackets provide both, letting a factory standardise on one method while keeping the other as a fallback.

Installation and Setup: A Practical Sequence
Step 1: Position the Bracket Without Tightening
Set the bracket in front of or beside the presser foot, with the exit of the guide channel pointing toward the needle. The channel exit should sit 2–4 mm from the needle line. Hand-turn the flywheel through a full cycle before tightening anything, and watch the needle bar travel past the bracket. If the needle or presser foot touches the bracket at any point in the cycle, move the bracket back and repeat.
Step 2: Set the Fold Width
Feed a strip of the actual production fabric through the entry channel by hand. Do not use a different fabric for setup; the fold width you get depends on fabric thickness and stiffness. Adjust the stop plate until the folded edge measures the target width with a steel rule. For a 6 mm fold, expect the stop plate to sit roughly 12–13 mm from the channel exit, because the fabric doubles over inside the channel.
Step 3: Align to the Needle
With the fold formed, check where the folded edge sits relative to the needle. The distance from the fold to the needle line is your finished seam allowance. Loosen the bracket screw and shift the whole assembly until the fold lines up. Tighten to firm contact — do not over-torque, since the bracket slot deforms easily. Re-check after tightening, because tightening often shifts the bracket by 0.3–0.5 mm.
Step 4: Balance Presser Foot Pressure and Feed Dog Height
Set pressure and feed dog height using the starting values in the specification section above, then adjust by 0.2–0.3 kgf or 0.1 mm at a time. This step is skipped more often than any other, and it causes most of the problems attributed to the gauge itself. For light fabric, reduce presser foot pressure so the fabric is not stretched as it passes through the channel. For heavy fabric, raise the feed dog slightly so the extra layers are actually driven forward rather than dragged.
Step 5: Test Sew on Scrap
Run at least three test pieces at production speed, not at hand-turning speed. Many feeding problems only appear above a certain rpm, because the fabric behaves differently when the feed dog is engaging rapidly. Check the fold width at the start, middle, and end of each test piece with a steel rule. If the width drifts by more than 0.5 mm across the piece, the bracket is moving or the fabric is being pulled sideways. If the stitch length shortens at the entry, the feed dog is too low.
Step 6: Record the Settings
Write down the fold width, stop plate position, presser foot pressure, and feed dog height for each operation. When the line changes from cuffs to waistbands and back, the operator can reset in a minute instead of re-tuning from scratch. This is the single most effective way to reduce setup variation across shifts.
Troubleshooting: Mapping Defects to Corrective Adjustments
Most complaints about a channel gauge trace back to one of five root causes: wrong presser foot pressure, wrong feed dog height, a loose or shifted bracket, a contaminated channel, or a worn pressure tongue. The matrix below maps the visible defect to the adjustment that fixes it. Work through the checks in order, because a defect such as a wavy cuff can have more than one cause, and adjusting two variables at once makes it impossible to know which one worked.
Defect 1: Wavy or Puckered Cuff
The seam looks rippled along its length, and the fabric may stand up behind the needle. This is almost always a tension problem between the feed dog and the presser foot, not a fault in the guide itself.
- Presser foot pressure too high. Reduce by 0.3 kgf and re-test on scrap. On light shirting, the correct setting is often in the 1.5–2.0 kgf range, and a machine left at a heavy-fabric setting will pucker every light piece.
- Feed dog height too high for the fabric. Lower to 0.7–0.8 mm for light fabric. Excessive feed dog protrusion pushes fabric up into the channel and creates a wave.
- Differential feed setting. If the machine has differential feed, check that the ratio is set for the fabric type. A ratio above 1:1.5 on a stable woven fabric will gather the lower ply.
- Thread tension unbalanced. Check the bobbin tension as well as the upper tension. A tight bobbin case spring can pucker a light seam even when the presser foot pressure is correct.
If none of the above resolves the wave, check that the folded edge is not being compressed inside the channel. A fold width set too narrow for the fabric thickness forces the fabric to buckle as it exits.
Defect 2: Fabric Jamming at the Entry Lip
The fabric stops feeding, the needle continues to stitch in place, and the operator has to lift the presser foot to clear the obstruction. This is the most common failure mode on any channel gauge and it has three frequent causes.
- Entry lip contaminated. Lint and fabric dust build up on the polished entry surface and increase friction. Clean the channel with a soft brush and compressed air. Do not scrape with metal tools.
- Feed dog too low. If the feed dog is set for light fabric but the operation involves three layers, the drive force is insufficient and the fabric stalls. Raise the feed dog to 1.0–1.2 mm for multi-layer joins.
- Presser foot pressure too low. Insufficient pressure lets the fabric lift off the feed dog at the entry, where the channel holds it back. Increase pressure in 0.3 kgf steps.
- Channel exit too far from the needle. If the exit sits more than 4 mm from the needle line, the fabric has room to twist and fold back on itself between the guide and the needle. Move the bracket forward to bring the exit within 2–4 mm.
Never pull the fabric backwards to clear a jam. Pulling against the feed direction bends the entry lip, and a bent lip will cause the same jam repeatedly. Lift the presser foot, cut the thread, and remove the fabric forward.
Defect 3: Seam Width Drift Along the Piece
The fold measures correctly at the start but has widened or narrowed by the end of the seam. This is a positional problem rather than a feeding problem.
- Bracket moving under vibration. Check the mounting screws for tightness. On a magnetic base, wipe the magnet face and the bed plate; an oil film can cut holding force by 30–50 percent and allow the base to creep. If the machine runs above 4,000 rpm, switch to a screw mount.
- Stop plate screw loose. A slotted stop plate held by a single screw will shift if the screw is not firm. Tighten to firm contact without over-torquing, which deforms the slot.
- Fabric being pulled sideways by the operator. Some operators instinctively steer the fabric, which overrides the gauge. The correct technique is to let the channel control the edge and only support the fabric's weight.
- Inconsistent fabric width. If the fabric panel itself varies in width, the fold will vary. Check the cut panel against the marker before blaming the gauge.
To isolate a positional cause from a feeding cause, run a test piece with the machine stopped every 100 mm and measure the fold. If the width is correct at each stop but drifts during running, the cause is feeding or vibration. If the width is already wrong at the first stop, the cause is the initial setup.
Defect 4: Fold Width Incorrect From the Start
The seam is consistent but the wrong width. This is a setup error, not a fault.
- Stop plate position wrong. Reset using the production fabric. Remember that the fabric doubles inside the channel, so a 6 mm finished fold needs the stop plate roughly 12–13 mm from the channel exit.
- Setup done on the wrong fabric. Fold width is fabric-dependent. A gauge set on cotton poplin will produce a different fold on jersey at the same stop position.
- Bracket aligned to the wrong reference. Confirm you are measuring from the folded edge to the needle line, not from the raw edge to the needle line.
Defect 5: Fabric Edge Curling or Rolling Inside the Channel
The edge does not fold flat; it rolls over on itself and produces a rounded, uneven fold. This is typical of soft knits and slippery linings.
- Presser foot pressure too high. Reduce to 1.5–2.0 kgf so the fabric is not compressed as it enters.
- Entry speed too fast. Slow the start of the seam. Most curling happens in the first 20 mm before the fold stabilises.
- Fabric too soft for the channel geometry. For very light or slippery materials, consider fusing or starching the edge before running it through the gauge. This is a legitimate production technique, not a workaround.
- Channel surface worn or scratched. A scratched channel increases friction unevenly and causes the edge to roll. Inspect under good light and replace the guide insert if the surface is damaged.
Defect 6: Needle Striking the Channel Exit
A clicking sound, broken needles, or visible marks on the channel exit. This is a safety issue and should be corrected immediately.
- Bracket too close to the needle line. Move the bracket back so the exit sits at least 2 mm from the needle. Hand-turn the flywheel through a full cycle to verify clearance before running the machine.
- Bracket shifted during operation. Re-check the mounting. A bracket that has moved once will move again unless the mounting is corrected.
- Wrong needle position or bent needle bar. If the clearance was correct and the strike recurs, check the needle bar for bend and confirm the needle is fully seated.
Defect 7: Pressure Tongue Not Holding the Fabric Down
The fabric lifts at the exit of the channel and the fold opens before the needle. The tongue has lost its pre-load curve through fatigue.
- Tongue fatigued. Replace it. A spring tongue that has lost its curve cannot be re-tensioned reliably, and the cost of a replacement is far below the cost of downtime.
- Tongue height wrong for fabric thickness. If the tongue was set for light fabric and the operation has changed to heavy, it will not reach the fabric. Reset the tongue height for the current fabric.
- Fabric path obstructed. Check that no lint or thread tail is trapped under the tongue, holding it off the fabric.
A Diagnostic Sequence That Works
When a defect appears and the cause is not obvious, work through this sequence in order. It takes about two minutes and avoids the common mistake of adjusting several variables at once.
- Stop the machine and inspect the channel for lint, thread tails, or damage.
- Check that the bracket has not moved. Measure the channel exit to needle distance with a steel rule.
- Run a scrap piece of the production fabric by hand-turning the flywheel. If it feeds cleanly by hand but jams at speed, the cause is feeding, not geometry.
- Measure presser foot pressure and feed dog height against the values in the specification section.
- Run a test piece at production speed and measure fold width at three points.
- Change one variable only, then re-test. Record what changed and the result.
Keeping a written record of these checks turns a recurring defect into a known fix. Over a few months, the record becomes the most useful document at the workstation, because it captures the specific settings that work for each fabric and operation in that factory.

Machine and Fabric Compatibility
Machines
The gauge is designed around the single-needle lockstitch machine, which remains the workhorse for cuff, placket, and waistband operations. It is not intended for overlock machines or coverstitch machines, where the trimming and stitching geometry is fundamentally different and the fabric path cannot be constrained the same way.
Within the lockstitch family, direct-drive and clutch-motor machines both work. Direct-drive machines with electronic needle positioning are easier to set up because the operator can stop with the needle down and inspect the fold without losing position. Machines running above 5,000 rpm need a screw mount rather than a magnetic base, because vibration at that speed exceeds the holding margin of most magnets.
Fabrics
Woven shirting and trouser fabrics are the primary target. Medium-weight cotton, poly-cotton, and twill all feed predictably through a channel guide because they hold a crease and have enough body to resist collapsing.
Knits are workable but require more attention. A soft jersey tends to curl at the entry lip and can roll unevenly. Lowering presser foot pressure to the 1.5–2.0 kgf range and slowing the entry speed helps. Very light or very slippery fabrics — lining materials, for example — are the hardest case, and some factories prefer to fuse or starch the edge before running it through the gauge.
Heavy denim and canvas are at the other end. The gauge will handle them, but the pressure tongue needs to be set higher, the feed dog raised to 1.0–1.2 mm, and the operator should expect to guide the fabric more actively at the entry.
Maintenance and Wear Parts
Clean the guide channel at the end of each shift. Lint, thread tails, and fabric dust accumulate on the channel surface and change the friction characteristics, which shows up as inconsistent fold width. A soft brush and compressed air are enough; avoid metal scrapers, which scratch the polished surface.
Check the mounting screws weekly. Vibration loosens them gradually, and a bracket that has shifted by half a millimetre will produce visible seam variation before anyone notices the cause. On magnetic bases, wipe the magnet face and the bed plate — a film of oil or lint reduces holding force significantly.
Inspect the pressure tongue for fatigue. A spring tongue that has lost its pre-load curve will stop holding the fabric down, and the symptom is fabric lifting at the exit rather than a jam. Replacement tongues are inexpensive compared with the downtime of running a worn one.
The stop plate is the second wear part to watch. Repeated tightening and loosening deforms the slot, and a deformed slot will not hold a width setting. Keep a spare stop plate for each gauge on the line.
Selection Tips for Parts Buyers
When specifying this class of attachment, the differences between suppliers come down to a few checkable points rather than brand claims. Work through the list below before placing a bulk order.
Check the Channel Finish
Ask for a close-up photograph of the entry lip and the inside of the channel. A polished, tapered entry is the single best indicator of build quality. Look for a visible radius at the entry rather than a sharp lip, and for a uniform surface inside the channel with no machining marks. A rough channel will abrade light fabrics and cause fold width to drift as friction changes.
Confirm the Adjustment Type
Slotted continuous adjustment is more flexible than stepped or fixed tabs, especially if you run multiple seam allowances on the same line. Check the slot length: it should cover at least the 6 mm to 12 mm allowance range in one continuous travel. If the supplier cannot state the adjustment range in millimetres, that is a warning sign.
Verify the Mounting Interface
Confirm whether the bracket ships with a screw mount, a magnetic base, or both. For a magnetic base, ask for the rated pull force in kilograms. Anything below 8 kg is unsuitable for machines running above 4,000 rpm. Measure your machine bed plate before ordering: a magnetic base will not hold on aluminium or composite tables, and a screw mount needs a threaded hole in the correct position.
Ask About Spare Parts
Pressure tongues and stop plates wear faster than the frame. A supplier who stocks these separately saves you replacing the whole unit when one component fails. Ask specifically for the part numbers of the tongue and the stop plate, and confirm they will still be available in twelve months. For a factory running ten machines, keeping two spare tongues per machine is a reasonable minimum.
Order a Sample Before a Bulk Order
Run a sample on your own fabric and machine at production speed, not at hand-turning speed. Set the presser foot pressure and feed dog height to the values in this article, then run ten pieces and measure fold width at three points on each. A gauge that performs well on the supplier's sample table may behave differently on a machine with a different feed dog height or presser foot pressure range. A variation of more than 0.5 mm across ten pieces indicates the gauge is not holding its setting.
Standardise Across the Line
For factories running several cuff and placket styles, it is worth standardising on one gauge model across the line. Operators learn one setup procedure, spare parts inventory stays simple, and troubleshooting becomes faster because the behaviour of the tool is already known. Standardisation also makes the setup record sheet meaningful, since the same numbers apply at every workstation.
Keep the Supporting Toolkit Consistent
A dedicated pair of tailor scissors for trimming test pieces, a steel rule for checking fold width, a depth gauge for feed dog height, and a small brush for channel cleaning are all that is needed to keep the setup accurate. These are ordinary items, but having them at the workstation is what makes a gauge reliable rather than merely present. Without a steel rule, the operator cannot verify fold width, and without a depth gauge, feed dog height becomes guesswork.
The second-generation PL (Professional Leader) gauge (item 1688-0663) is one example of this attachment class, and the structural principles and diagnostic sequence described here apply across comparable products from other suppliers. Evaluate any of them on channel geometry, adjustment range, mounting method, and rated magnet pull force — those four factors determine whether the tool reduces variation on the line or simply moves the problem to a different step. A magnetic seam guide used as the mounting method adds flexibility, but the guide channel itself is what ultimately controls the seam, and a written troubleshooting record is what keeps it controlling the seam shift after shift.
PL (Professional Leader) supplies sewing machine parts for industrial lockstitch, overlock and interlock machines, including the industrial presser foot range, needle plates, feed dogs and related presser foot accessories. The full sewing machine parts and presser foot catalogue is listed at pinseam.com.
Need this part for your workshop?
Get a Free Quote on WhatsApp: +86 137 3825 6697Browse the full catalog at pinseam.com · Free 2026 full catalog (PDF) · Related guide: magnetic seam guide
📢 New arrivals & factory updates on Telegram — join our channel
Edited by the technical team at PL (Professional Leader) — high-quality sewing machine accessories from China. About our factory | Catalog: pinseam.com | WhatsApp: +86 137 3825 6697 | Telegram: @plsewingparts
Explore Our Parts Guides
- sewing machine accessories, needle threaders & thread guides
- industrial & magnetic seam guides
- presser foot guide: types & compatibility
- industrial presser feet for factory lines
- roller & rolled hemmer presser feet
- industrial sewing machine parts & spare parts
- wholesale sewing machine parts, factory direct
- about PL (Professional Leader)
Questions about a specific part? Chat with us on WhatsApp +86 137 3825 6697 — factory direct, reply within hours.


Comments
Post a Comment