How to Install an Industrial Presser Foot Edge Binding Attachment
The PL-165 elastic binding folder is a single-fold, double-layer attachment that mounts on a lockstitch machine to wrap elastic tape or webbing around a fabric edge in one pass. This article explains how the attachment works, how to install and thread it, how to set tension and alignment with reference values, and which mistakes cause wavy edges, skipped coverage, or tape jams. It is written for garment factory managers, sewing technicians, and parts buyers who need to get this class of attachment running correctly and keep it running.
Related guide: industrial presser foot — types, fitting and machine compatibility.
What Problem an Industrial Presser Foot Binding Attachment Solves
Binding an elastic edge with a standard presser foot is a two-hand operation. One hand feeds the tape, the other steers the garment, and the fold has to be formed by feel. On stretch material the result is inconsistent: the tape twists, the fold width drifts, and the elastic is stretched unevenly along the seam. On a run of several thousand pieces, that variation shows up as rejected garments at final inspection.
A binding folder removes the hand-forming step. The tape enters a formed channel, folds automatically, and exits at a fixed width and angle relative to the needle. The operator only has to feed the fabric edge into the mouth of the folder and keep it against the guide. Fold width, tape position, and edge coverage become properties of the tool rather than properties of the operator's hands.
This matters most on elastic binding, where three variables interact: tape tension, fold geometry, and feed rate. A folder cannot eliminate tension problems, but it makes them repeatable. Once the correct setting is found, it can be reproduced on the next machine, the next shift, and the next operator.
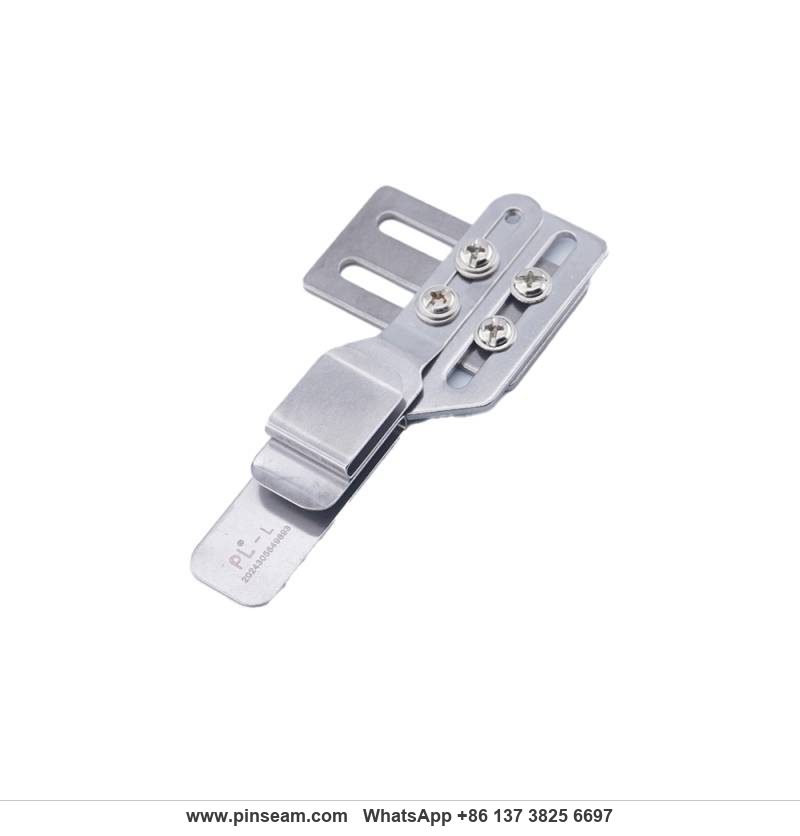
How the PL-165 Single-Fold Double-Layer Folder Works
The PL-165 is a single-fold, double-layer folder. "Single-fold" means the tape is folded once, producing two layers. "Double-layer" describes the result: the folded tape presents an upper and a lower layer that together wrap the raw fabric edge, with the fold line sitting on one face of the garment.
The tape path through the folder
Tape enters the rear of the attachment through an intake slot sized to the tape width. A short forming section twists the tape progressively rather than sharply, which is why the internal surfaces are polished. The tape then passes through a narrowing channel that closes the fold, and exits at the front mouth as a flat, open C-shape. The fabric edge enters the same mouth from the side and slides into the opening of the C. Needle and feed dog then carry both materials forward together.
The critical dimension is the gap between the folded tape edges and the fabric. If the tape fold is too tight, the fabric edge will not enter cleanly and the operator has to force it, which distorts the edge. If the fold is too loose, the tape will not grip the fabric and the stitch line will sit off the tape.
Why the folder is mounted ahead of the needle
The folder is fixed to the needle plate area or the machine table, not to the presser foot bar. This is deliberate. The fold must be fully formed before the material reaches the presser foot, so the foot can compress a stable fold instead of forming one. Mounting the folder on the presser foot bar would couple fold formation to foot pressure and produce inconsistent results as pressure changes.
Elastic versus rigid webbing behaviour
Elastic tape and rigid webbing behave differently in the same channel. Elastic tape stretches as it is pulled through and recovers after the needle, which means the fold width in the finished seam depends on how much stretch was present at the point of stitching. Rigid webbing does not recover, so the fold width in the channel is the fold width in the seam. This is the main reason an elastic binding setup needs a tension control element ahead of the folder, while a rigid webbing setup often does not.
Specifications and Materials
The PL-165 is identified by model number, and that model number corresponds to a specific binding width and tape passage dimension. Buyers should treat the model number as a specification, not a generic label.
- Function: single-fold, double-layer edge binding for elastic tape and webbing
- Mounting: standard lockstitch machine interface, fixed by screw to the needle plate area or table surface
- Body material: metal, with polished internal passage to reduce friction
- Compatible tape types: common elastic bands, elastic webbing, and standard rigid webbing within the rated passage size
- Typical applications: underwear and brief waist and leg openings, sportswear and yoga wear necklines, cuffs and hems, infant and children's wear edges, home textile edges, bag and footwear trim
What the model number actually tells you
Before ordering, confirm two numbers against the drawing or the sample: the finished binding width and the maximum tape thickness the passage accepts. A folder rated for a thin elastic band will not pass a thick woven webbing of the same width. Conversely, a folder sized for thick webbing will let thin elastic wander inside the channel, which shows up as a wandering fold line.
Where a factory runs several tape specifications on the same machine, the practical answer is usually two or three folders rather than one folder adjusted between runs. Re-setting a folder between tape types costs more machine time than swapping a pre-set unit.
Model Number to Tape Size Mapping
Binding folders in this family are specified by the finished binding width they produce, not by the machine they fit. The table below shows how the model designation maps to tape dimensions and typical applications. Use it as a selection reference, and confirm the exact figures against the supplier's drawing before committing to a production order.
- PL-165 (nominal 16 mm class): finished binding width approximately 12–16 mm. Accepts elastic band or webbing of 20–32 mm flat width, 0.8–1.5 mm thickness. Typical use: brief and boxer waist and leg openings, sportswear cuffs, mid-weight knit hems.
- PL-165 narrow variant (nominal 10 mm class): finished binding width approximately 8–10 mm. Accepts tape of 14–20 mm flat width, 0.6–1.0 mm thickness. Typical use: lingerie edges, infant necklines, lightweight knit trims.
- PL-165 wide variant (nominal 20–25 mm class): finished binding width approximately 18–25 mm. Accepts tape of 32–50 mm flat width, 1.0–2.0 mm thickness. Typical use: outerwear hems, bag edges, decorative webbing trim.
The general relationship is that the tape flat width is roughly 1.8 to 2.0 times the finished binding width, because the tape is folded once and both layers wrap the fabric edge. A 16 mm finished binding therefore needs roughly 32 mm of flat tape. If your finished binding is coming out narrower than expected, check whether the tape is being over-stretched before it reaches the fold, not whether the folder is the wrong size.
Tape thickness is the limiting factor
Width is the visible specification; thickness is the one that causes jams. A channel that passes 1.0 mm elastic freely may bind on 1.5 mm webbing even at the same width. When ordering, state both the flat width and the measured thickness of the tape you intend to run. If you are between two sizes, choose the larger channel and control the tape with tension rather than choosing the smaller channel and forcing the tape.
Installation: Step by Step
Installation follows a fixed sequence. Doing the steps out of order, particularly adjusting alignment before the folder is rigidly mounted, wastes time because every later adjustment disturbs the earlier one.
Step 1: Prepare the machine
- Power off and lock out the machine.
- Remove the standard presser foot if it obstructs the mounting area, and fit the foot you intend to run with the folder. A narrow foot gives the folder mouth more clearance.
- Clean the needle plate and the area in front of it. Lint and tape residue under the mounting surface will tilt the folder when it is tightened down.
- Confirm the needle plate screw holes you intend to use are clear and undamaged.
Step 2: Mount the folder
Position the folder in front of the needle plate so the exit mouth points toward the needle. The fold line should sit on the side of the seam where the finished garment requires it. Tighten the mounting screw until the folder is rigid — a folder that can be deflected by hand will move during sewing and the fold will drift.
Do not fully tighten the angle adjustment yet. You need a small amount of freedom for the alignment step.
Step 3: Thread the tape by hand
With the machine off, feed the tape into the intake slot at the rear and push it through until it emerges from the front mouth. Do not pull it through with pliers; a sharp pull can crease the tape or, on elastic, over-stretch it and set a false reference for tension.
Check that the tape is not twisted anywhere in the channel. A single twist at the intake will travel through and appear as a flipped fold at the needle, which is easy to misdiagnose as a folder defect.
Step 4: Align the fold to the fabric edge
Slide a piece of the actual production fabric into the mouth of the folder and into the opening of the folded tape. Adjust the folder angle and height until the folded tape edges sit flush with the fabric edge — the fabric should be fully enclosed with no raw edge visible outside the tape, and no excess tape hanging past the fabric.
As a working target, the upper and lower tape layers should each extend 0.5 to 1.0 mm past the fabric edge before stitching. After stitching, the seam allowance inside the fold should be 1.0 to 2.0 mm, so the needle always lands on tape rather than on the fabric edge. If the fabric edge is visible after stitching, the tape is too narrow or the folder is misaligned by more than 1 mm.
Use the production fabric, not a scrap of different weight. A folder aligned on a light scrap will be misaligned on the actual material.
Step 5: Set needle position and stitch line
Turn the handwheel by hand through one full stitch cycle and watch where the needle will land relative to the tape. On a single-fold binding, the stitch line should fall on the tape, typically 1.5 to 3.0 mm from the outer fold edge, so that the stitch catches both tape layers and the fabric. If the needle falls off the tape or into the gap between tape and fabric, adjust the lateral position of the folder, not the needle.
Step 6: Low-speed test run
Run the machine at low speed, around 800 to 1,200 stitches per minute, for 200 to 300 mm of seam. Stop and inspect:
- Is the fabric edge fully covered along the whole length?
- Is the fold width constant to within ±0.5 mm?
- Is the fabric edge puckered or wavy?
- Is the elastic evenly stretched, or does it relax in places?
Adjust one variable at a time and re-test. Changing angle, height, and tension simultaneously makes it impossible to know which change produced the improvement.

Tension Control and Elastic Behaviour
On elastic binding, tension is the variable that most often decides whether the job runs. The rule is straightforward: the elastic must arrive at the needle under controlled, moderate tension.
- Too much tension: the elastic is stretched at the needle and contracts after it passes, gathering the fabric edge into waves. The seam looks puckered and the garment edge will not lie flat.
- Too little tension: the elastic arrives slack, the fold opens, and the stitch line sits off the tape or the tape fails to grip the fabric edge. The binding looks loose and will not hold its shape in wear.
Use the tension adjustment structure at the front of the folder to fine-tune. As a starting reference for elastic binding, aim for an elastic stretch of 5 to 12 percent at the point of stitching for a standard garment edge, and up to 15 to 20 percent where the finished edge must grip firmly, such as a brief waistband. Below about 3 percent stretch the fold tends to open; above about 25 percent the fabric edge will pucker on most knitted materials. Make the adjustment in small increments and re-test after each one.
Elastic and fabric feed must be matched
Elastic binding fails when the tape feed rate and the fabric feed rate differ. If the elastic is fed faster than the fabric, excess tape accumulates ahead of the needle and forms a ripple. If it is fed slower, the tape is stretched along the seam and the finished edge contracts. The folder helps by holding the tape geometry, but the operator still controls the relative feed by how the fabric edge is presented.
For operators new to the attachment, a short training period on scrap at low speed is worth the machine downtime. The skill being learned is presenting the fabric edge at a constant rate and angle, not managing the tape.
Machines and Materials This Attachment Suits
The PL-165 is designed for lockstitch machines with a standard mounting interface. It is not an overlock or coverstitch attachment, and it should not be adapted to one. On a serger, edge binding is normally handled by a dedicated binding attachment that feeds into the trimming and stitching zone, which is a different geometry.
Suitable machine types
- Single-needle lockstitch machines, flat bed, with a clear needle plate area
- Machines running a narrow presser foot that leaves clearance at the folder mouth
- Machines where the folder can be screwed down rigidly without interfering with the feed dog or needle plate screws
Suitable materials
- Knitted and woven garment fabrics where an elastic or webbing edge finish is required
- Elastic bands and elastic webbing within the folder's rated passage size
- Rigid webbing for trim, reinforcement, and decorative edging
Thin, highly elastic tape and thick rigid webbing are at opposite ends of the folder's working range. Both can be run, but not with the same setting. Treat them as separate setups.
Common Mistakes and Maintenance
Most reported problems with this class of attachment trace back to a small number of causes. The list below covers the ones that appear most often on the factory floor.
Installation and setup mistakes
- Mounting the folder loosely. Vibration moves it during the run and the fold drifts. Tighten the mount before adjusting anything else.
- Aligning on the wrong fabric. Setting up on a light scrap and then running heavy material produces a fold that no longer covers the edge.
- Adjusting several variables at once. Change one thing, test, then change the next.
- Setting the folder on the presser foot bar. The fold forms under changing foot pressure and becomes inconsistent.
- Using a presser foot that blocks the mouth. A wide or bulky foot restricts the fabric path and forces the operator to fight the machine.
Running mistakes
- Over-tensioning elastic to keep the fold closed. This trades a fold problem for a puckering problem. Fix the fold geometry instead.
- Pulling tape through by hand with force. This over-stretches elastic and sets a false tension reference.
- Ignoring a single twist at the intake. It shows up as a flipped fold at the needle and is often misread as a defective folder.
- Running at full speed immediately after setup. Always confirm the setup at low speed first, then increase to production speed in stages.
- Using the same folder setting for two tape types. Switching between elastic and rigid webbing without re-setting the fold gap is a common cause of intermittent jams.
Troubleshooting quick reference
- Wavy or puckered edge: elastic over-stretched at the needle. Reduce stretch to the 5–12 percent range and re-test.
- Fabric edge not fully covered: folder misaligned by more than 1 mm, or tape too narrow. Re-align and confirm the tape flat width is about 1.8–2.0 times the finished binding width.
- Fold line wandering along the seam: folder mounted loosely, tape twisted at intake, or channel oversized for the tape thickness.
- Tape jamming in the channel: lint accumulation or tape thickness above the rated passage. Clean the channel and confirm the tape measures within the model's thickness range.
- Skipped stitches at the fold: needle landing off the tape. Move the folder laterally so the stitch line sits 1.5–3.0 mm from the outer fold edge.
- Fold opening after stitching: insufficient elastic tension or the fold gap set too wide. Reduce the gap and increase tension in small increments.
Maintenance
Lint, thread fragments, and tape residue accumulate in the channel and increase friction. Increased friction is the usual cause of a folder that used to run cleanly and now jams or produces a wandering fold.
- Clean the internal passage regularly with compressed air and a soft brush.
- Do not scrape the polished channel with metal tools; scratches raise friction permanently.
- Check the mounting screws for tightness as part of routine machine maintenance.
- Re-check the fold gap whenever you change tape thickness or tape type.
- Inspect the intake slot for burrs if tape starts snagging at the entry.
A folder that is cleaned on schedule and re-set when tape specifications change will outlast several tape specifications. A folder that is never cleaned will be blamed for problems that are actually friction.
Practical Selection Tips for Buyers
Buying this type of attachment is a specification exercise. The following points are the ones that most often decide whether a purchase works out.
Match the model number to the tape, not to the machine
Machine compatibility is usually straightforward — most lockstitch machines accept a standard mount. The variable that causes returns is tape size. Confirm the finished binding width and the tape passage dimension against the actual tape you will run, using the mapping table above as a starting point.
Buy for the tape range, not the tape you run today
If the factory is likely to add a different elastic or webbing specification within the year, plan for a second folder now. Folders are inexpensive relative to the machine time lost to re-setting between runs.
Check the internal finish before judging performance
A polished internal passage is what keeps elastic and webbing moving smoothly. On any presser foot for industrial machine edge-binding attachment, the internal surface quality matters more than the external appearance. Inspect the channel on receipt.
Standardise the setup across machines
Where several machines run the same binding operation, record the folder angle, height, tension setting, and stitch-line distance for each. A written setup record lets a technician reproduce a known-good configuration instead of re-developing it, which is the single largest time saving in this type of work.
Keep spare mounting hardware
Mounting screws are small, easily lost, and specific to the interface. Keeping a small stock of the correct screws avoids a machine standing idle over a part that costs almost nothing.
Frequently Asked Questions
Can this attachment be used on an overlock machine?
No. The PL-165 is designed for lockstitch machines with a standard mounting interface. Overlock and coverstitch machines use different binding attachment geometry that feeds into the trimming and stitching zone.
Why does the elastic pucker after binding?
Almost always because the elastic was over-stretched at the needle. Reduce tape tension in small increments until the stretch at the point of stitching is in the 5 to 12 percent range, and re-test. If the puckering persists at low tension, check that the fabric and tape are being fed at matched rates.
Why does the fold line wander along the seam?
Check three things in order: whether the folder is rigidly mounted, whether the tape is twisted at the intake, and whether the folder is correctly sized for the tape thickness. A folder that is too large for the tape lets it move inside the channel.
How do I know if my folder is the right size for my tape?
Measure the flat width and thickness of the tape, then compare against the model specification. As a rule, the tape flat width should be about 1.8 to 2.0 times the finished binding width, and the tape thickness should sit within the rated passage range. If either figure is outside the range, the folder is the wrong size regardless of how well it fits the machine.
How often should the channel be cleaned?
It depends on the material. Lint-heavy fabrics and elastic tapes that shed residue require more frequent cleaning than clean woven webbing. A practical rule is to clean at every shift change on high-volume elastic work, and at every setup change on lower-volume work.
Can one folder handle both elastic and rigid webbing?
It can, but not at the same setting. Elastic and rigid webbing behave differently in the channel, and the tension requirement differs. Treat them as separate setups and record the settings for each.
Summary
The PL-165 is a single-fold, double-layer binding folder for lockstitch machines, used to wrap elastic tape or webbing around a fabric edge in one pass. Getting it to run well comes down to four things: a rigid mount, correct alignment of the fold to the fabric edge on the actual production material, moderate and controlled elastic tension in the 5 to 12 percent stretch range, and a clean internal channel. Setup should be done one variable at a time at low speed, and settings should be recorded so they can be reproduced. For factories running several tape specifications, the practical approach is a folder per specification rather than repeated re-setting, and for buyers the key check before ordering is that the model number matches the tape width and thickness, not just the machine. A correctly specified industrial presser foot edge-binding attachment turns a variable hand operation into a repeatable one, which is the whole point of fitting it in the first place.
PL (Professional Leader) supplies sewing machine parts for industrial lockstitch, overlock and interlock machines, including the industrial presser foot range, needle plates, feed dogs and related presser foot accessories. The full sewing machine parts and presser foot catalogue is listed at pinseam.com.
Need this part for your workshop?
Get a Free Quote on WhatsApp: +86 137 3825 6697Browse the full catalog at pinseam.com · Free 2026 full catalog (PDF) · Related guide: industrial presser foot
📢 New arrivals & factory updates on Telegram — join our channel
Edited by the technical team at PL (Professional Leader) — high-quality sewing machine accessories from China. About our factory | Catalog: pinseam.com | WhatsApp: +86 137 3825 6697 | Telegram: @plsewingparts
Explore Our Parts Guides
- sewing machine accessories, needle threaders & thread guides
- industrial & magnetic seam guides
- presser foot guide: types & compatibility
- industrial presser feet for factory lines
- roller & rolled hemmer presser feet
- industrial sewing machine parts & spare parts
- wholesale sewing machine parts, factory direct
- about PL (Professional Leader)
Questions about a specific part? Chat with us on WhatsApp +86 137 3825 6697 — factory direct, reply within hours.


Comments
Post a Comment