How to Install and Adjust an Industrial Presser Foot Seam Guide
This article explains how to install, adjust, and maintain an adjustable lap-seam and butt-seam guide (also called a puller tube or binding folder) on a lockstitch or synchronous feed machine. It covers the mechanism, materials, step-by-step mounting procedure, machine and fabric compatibility, common mistakes, and practical selection criteria for garment factories and parts buyers. The device itself is a bolt-on industrial presser foot accessory that controls how two plies of fabric enter the needle, so most of the value lies in correct setup rather than in the hardware alone.
Related guide: industrial presser foot — types, fitting and machine compatibility.
What Problem This Industrial Presser Foot Accessory Solves
On a standard lockstitch machine, the operator controls ply alignment by hand. On lap seams, butt seams, and topstitching runs, that manual control produces variation. A 1 mm shift in overlap on a shirt side seam is invisible. The same shift on a 4 mm topstitch line down a denim leg is a visible defect that ends up in the second-quality bundle.
The adjustable lap-seam guide addresses three specific production problems:
- Inconsistent overlap width. The folder's entry slot sets a fixed overlap or butt-joint geometry, so every piece enters the needle with the same ply relationship.
- Hand fatigue and speed limits. Operators who must hold two plies in alignment cannot run at full machine speed. A guide removes that constraint on long runs.
- Skill dependency. Alignment quality stops depending on how experienced the operator is on that particular operation, which matters when you rotate staff across lines.
This is not a universal solution. It is a dedicated attachment for specific seam types, and it earns its place on high-volume operations where the same seam repeats thousands of times per shift.
How the Guide Works: Mechanism and Adjustment
Fabric path through the folder
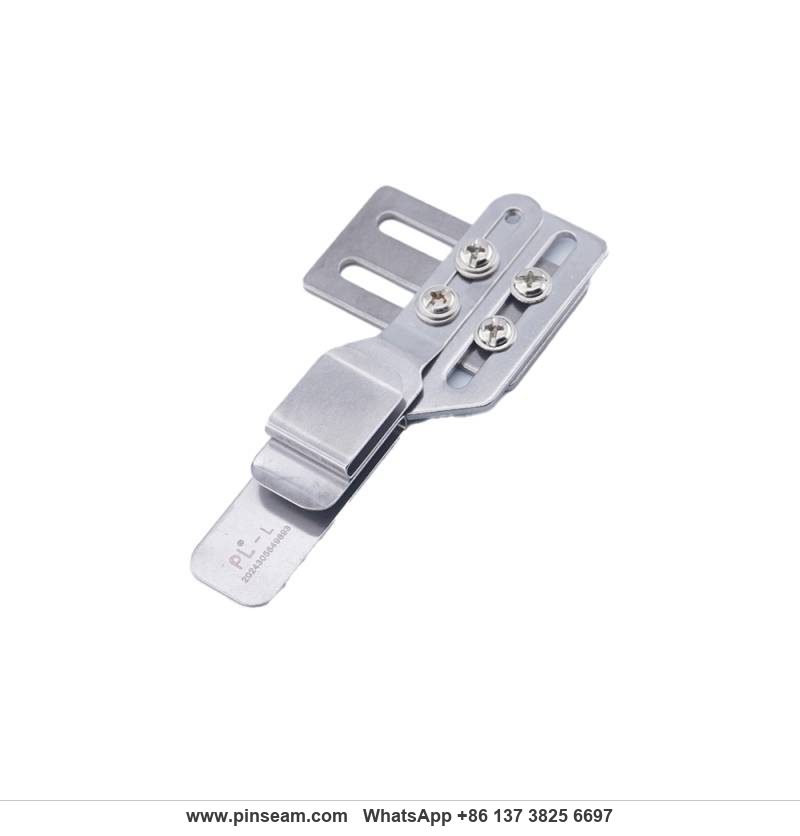
The folder is a formed metal channel that sits ahead of the needle. Fabric enters the wide mouth of the channel, passes through a narrowing guide slot, and exits directly under the presser foot. The geometry of that slot determines the ply relationship at the moment of stitch formation.
For a lap seam, the channel is profiled so the top ply is offset laterally from the bottom ply by a set amount. For a butt joint, the two raw edges are brought edge-to-edge and held flat, producing a flat seam with no overlap and no folded edge.
Adjustable overlap width
The entry section carries an adjustment mechanism, typically a slotted bracket or a movable guide plate secured by a screw. Loosening the screw allows the operator or mechanic to shift the guide laterally, changing how much the upper ply overlaps the lower ply. Once set and locked, the overlap width repeats on every piece until the setting is changed.
This is the key difference between a fixed folder and an adjustable one. A fixed folder is dedicated to one overlap dimension. An adjustable folder covers a range, which reduces the number of part numbers a factory needs to stock for a given family of operations.
Thin and thick material configurations
The guide slot clearance must match the fabric stack thickness. Two plies of chiffon and two plies of 12 oz denim do not behave the same way in a 1.5 mm slot. The product is supplied with selectable slot geometry or with a slot that can be opened or closed by adjustment, so the same body covers light to medium-heavy work.
On light material, an oversized slot lets the fabric wander and the seam edge curls. On heavy material, an undersized slot jams the fabric at the entry and causes the feed to stall or the needle to deflect. Matching slot clearance to the actual stack is the single most important setup decision.
Integrated topstitch guidance
Because the folder controls the lateral position of the seam assembly, it also controls where the topstitch lands relative to the seam line. On operations that combine joining and topstitching, this removes a second alignment step. The stitch line stays parallel to the seam edge because the fabric edge position is fixed by the guide, not by the operator's eye.
Specifications and Materials
Buyers evaluating factory sewing parts of this type should check the following points before committing to a stock order.
- Body material. Formed and surface-treated metal. The treatment resists corrosion and reduces friction at the fabric contact surfaces. Untreated or poorly finished guide slots will scuff coated and delicate fabrics.
- Adjustment hardware. The adjusting screw and bracket should hold position under machine vibration. A screw that drifts will change overlap width mid-run, which is worse than no adjustment at all.
- Mounting interface. The bracket must match available threaded holes on or near the needle plate and presser foot area of the target machine. Hole spacing varies between machine brands and between flat-bed and cylinder-bed configurations.
- Slot finish. Run a fingernail along the inside of the guide slot. Any burr or step will catch fabric and cause puckering or snagging, particularly on fine knits and lining material.
- Clearance envelope. The unit should not obscure the operator's view of the needle or interfere with the presser foot lift, the needle bar path, or the thread take-up lever.
For a presser foot manufacturer supplying export markets, these are also the tolerance points that determine return rates. Most field complaints about seam guides trace back to slot finish and adjustment stability, not to the forming of the body itself.
Step-by-Step Installation on a Lockstitch or Synchronous Machine
Step 1: Prepare the machine
- Power down the machine and, on automated units, lock out the drive.
- Remove the existing presser foot if it obstructs the intended mounting point. On most installations the folder mounts to the needle plate area or to a bracket adjacent to the presser foot, so the standard foot can often stay in place.
- Clean the mounting area. Thread lint and oil residue under a bracket cause it to sit off-angle, which throws off the guide path.
- Confirm there are usable threaded holes near the needle plate. If none exist, you need the machine-specific adapter bracket for that head.
Step 2: Mount the folder body
- Seat the bracket on the mounting holes and start both screws by hand. Do not tighten yet.
- Position the folder so the exit of the guide slot sits directly in front of the needle, with the fabric path centred on the needle drop point.
- Check clearance: the folder must not touch the needle bar, the presser foot, the feed dog path, or the needle plate cutout during a full hand rotation of the machine.
- Tighten the mounting screws firmly once the position is confirmed.
Step 3: Set the overlap or joint geometry
- Loosen the adjustment screw on the entry section.
- Feed a scrap sample of the actual production fabric through the guide by hand, with the plies arranged as they will be in production.
- Shift the guide plate until the overlap width matches the specification on the operation sheet. For butt joints, adjust until the two raw edges meet without gap and without riding over each other.
- Tighten the adjustment screw and re-check by pulling a second sample through.
Step 4: Dry-cycle before powering up
Rotate the handwheel through several full cycles with fabric in the guide. Watch three things: whether the fabric tracks straight through the slot, whether the needle clears the fabric edge cleanly, and whether the presser foot lifts without dragging on the folder. Correct any interference before running the motor.
Step 5: Test sew and verify
- Sew a test run of at least ten pieces at production speed.
- Measure overlap width at the start, middle, and end of the run. If it drifts, the adjustment screw is not holding and needs to be re-torqued or the bracket replaced.
- Check the seam for puckering, edge curl, and skipped stitches. Puckering on light fabric usually indicates excessive slot clearance or too much presser foot pressure.
- Confirm topstitch spacing against the specification before releasing the operation to the line.
Step 6: Document the setting
Record the adjustment position — a mark on the bracket, a measurement from a reference edge, or a photo — so the setting can be restored after a style change. On multi-style lines, this is what turns a one-time setup into a repeatable standard.
Machine and Fabric Compatibility
Suitable machines
- Lockstitch (flat-bed) machines. The primary application. Single-needle lockstitch heads handle the majority of lap-seam and butt-seam work in garment assembly.
- Synchronous feed machines. Machines with a walking foot or compound feed, including units with a puller wheel, work well because the fabric transport is more positive. This reduces the chance of the guide pulling the fabric off-line on heavy material.
- Not intended for overlock or coverstitch machines. Sergers and coverstitch heads have a different needle and trimmer geometry. This class of guide is designed for the flat-bed lockstitch platform.
Suitable fabrics
- Light material: lining, interlining, chiffon, light shirting. Use the tightest workable slot clearance and reduce machine speed. Light fabric is the harder case, not the easier one, because it deforms easily and shows every irregularity.
- Medium material: cotton twill, poplin, standard suiting, most knit and woven apparel fabrics. This is the design centre of the product and where setup is most forgiving.
- Medium-heavy material: denim, canvas, coated fabric, bag and luggage material. Check entry smoothness carefully. On coated fabric, verify that the guide slot does not mark the surface.
Common Mistakes and Maintenance
Mistakes seen in the workshop
- Setting the guide by eye instead of by sample. The overlap width must be verified with the actual production fabric, not with a scrap of a different weight.
- Running light fabric at full speed. Speed increases the tendency of light plies to shift and curl in the slot. Reduce speed and let the guide do the alignment work.
- Ignoring lint build-up. A small accumulation of thread fuzz in the guide slot changes the effective clearance and starts pushing the fabric off-line. This is the most common cause of a guide that "used to work".
- Over-tightening the adjustment screw. This deforms the bracket and makes fine adjustment impossible afterward.
- Skipping the interference check. A folder that grazes the needle bar or presser foot will eventually cause a broken needle or a bent bracket.
Routine maintenance
- Clean the guide slot at every shift change on high-volume operations, or at least once per day. Compressed air plus a soft brush is sufficient.
- Check the adjustment screw torque weekly. Vibration loosens it gradually.
- Inspect the slot surfaces monthly for wear, burrs, or plating breakdown. Replace the unit when the slot surface is no longer smooth.
- Re-verify overlap width after any style change, machine service, or presser foot replacement.
Practical Selection Tips for Buyers and Line Managers
- Match the guide to the machine head, not just the operation. Confirm hole spacing and bracket geometry against the specific machine model on the floor. A guide that fits one brand of flat-bed may not fit another.
- Buy for the thickness range you actually run. If 80 percent of your volume is medium-weight woven, that is the configuration to standardise on. Keep one adjustable unit for the light and heavy exceptions rather than stocking three fixed folders.
- Check slot finish on sample units before a bulk order. This is the quality characteristic that most directly affects operator acceptance and defect rates.
- Standardise across lines where possible. Fewer part numbers means simpler spare parts inventory and faster changeover. This is where a consistent China sewing parts supplier relationship pays off in logistics rather than in unit price.
- Ask for the adjustment range in millimetres. A stated overlap range tells you whether one unit covers your full style matrix or whether you need two.
- Keep spare adjustment screws and brackets on site. These are the wear items. Losing a shift to a missing bracket screw is an avoidable cost.
For factories running a mixed product mix, the practical approach is to treat the adjustable guide as a standard tool for the two or three highest-volume lap-seam and butt-seam operations, and to keep the setup parameters documented for each. In the PL range, this adjustable lap-seam guide is supplied in thin and thick material configurations with a screw-fixed bracket for flat-bed and synchronous machines, which covers the common cases without requiring a custom folder. The value to the line comes from the setup discipline described above, not from the part alone.
Get the installation right, verify with production fabric, and clean the slot on a schedule. An industrial presser foot accessory of this type will hold its setting for months of production and remove a persistent source of seam variation from the line.
Need this part for your workshop?
Get a Free Quote on WhatsApp: +86 137 3825 6697Browse the full catalog at pinseam.com · Free 2026 full catalog (PDF) · Related guide: industrial presser foot
📢 New arrivals & factory updates on Telegram — join our channel
Edited by the technical team at PL (Professional Leader) — high-quality sewing machine accessories from China. About our factory | Catalog: pinseam.com | WhatsApp: +86 137 3825 6697 | Telegram: @plsewingparts
Explore Our Parts Guides
- multifunctional needle threader guide — how to use & choose
- jack multifunctional needle threader — one-second threading
- sewing machine accessories, needle threaders & thread guides
- industrial & magnetic seam guides
- presser foot guide: types & compatibility
- industrial presser feet for factory lines
- roller & rolled hemmer presser feet
- industrial sewing machine parts & spare parts
- wholesale sewing machine parts — PL (Professional Leader) factory direct
- about PL (Professional Leader) — Hangzhou Fubang, sewing parts brand since 2018
Questions about a specific part? Chat with us on WhatsApp +86 137 3825 6697 — factory direct, reply within hours.


Comments
Post a Comment