Cuff Binder Attachment Guide: Installation and Use for Industrial Machines
Garment factories and sewing technicians frequently face a common bottleneck: producing consistent, narrow hem folds on cuffs, trouser bottoms, and sleeve openings. Manual folding is slow, inconsistent, and ties up an experienced operator on a task that should be routine. This article provides a practical, step-by-step guide to installing and using a cuff binder attachment (model 5674-A), a specialized sewing machine accessory designed to automate this process. You will learn the mechanical principles behind the tool, precise installation steps, techniques for feeding different fabrics, and how to avoid the most common operational errors.
Related guide: magnetic seam guide — types, fitting and machine compatibility.
The Problem: Why Cuff Hemming Is a Production Bottleneck
Folding a 6mm to 12mm hem on a cylindrical garment part, such as a cuff or trouser hem, is deceptively difficult. The fabric must be folded evenly on both the top and bottom layers, fed at a consistent rate, and stitched straight—all while the operator manages the bulk of the garment. Without a dedicated guide, output is limited to roughly half the speed of a standard seam operation, and defect rates climb due to twisted folds or skipped edges.
A cuff binder (also known as a hemming foot or binding attachment) solves this by performing the folding action mechanically. The operator simply feeds the raw edge of the fabric into a spiral or tunnel-shaped guide. The guide folds the fabric over onto itself, presenting a perfectly uniform double-fold hem directly under the needle. This removes operator skill variability from the equation, making the process repeatable across shifts and across different operators.
For factories running lockstitch machines or overlock machines, this type of sewing machine accessories is a low-cost upgrade that delivers immediate gains in both speed and consistency. The following sections detail how the model 5674-A achieves this, and how to get the most out of it on your shop floor.
How a Cuff Binder Works: The Mechanics of Folding
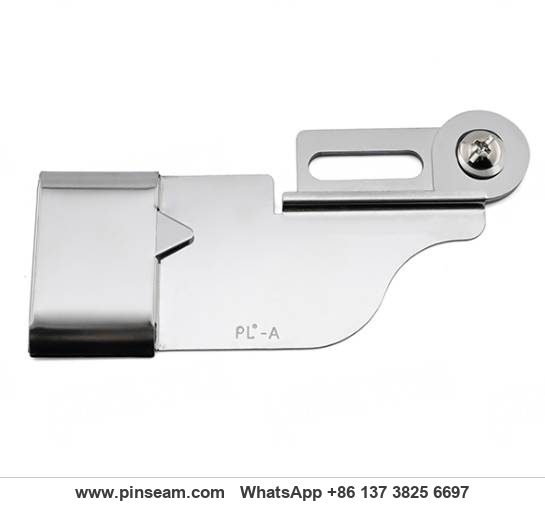
Understanding the mechanism of the binder is essential for effective use. The model 5674-A is a "A-type" narrow binder, designed specifically for hems in the 6mm to 12mm range. It is a passive device; it contains no moving parts that require power. Instead, it relies on the geometry of its internal channels to fold the fabric.
The Role of the Scroll and Guide Channel
The binder consists of a metal plate with a precisely curved entry point, often called the scroll, and a folded channel that leads to the needle. As you push the raw edge of the fabric into the scroll, the fabric is forced to roll inward. The channel then holds this folded configuration flat and stable as it travels toward the presser foot. The critical adjustment is ensuring the folded edge aligns perfectly with the needle's penetration point.
This model features a polished, smooth internal surface. This is not merely cosmetic; it is a functional requirement. A rough or burred channel will catch on the fabric fibers, causing the fold to shift or the fabric to stretch, particularly on lightweight knits. The polished finish ensures the fabric slides with minimal resistance, which is critical for maintaining a consistent fold width.
Fixed Width vs. Adjustable Models
It is important to note that the 5674-A is a fixed-width binder. Unlike adjustable hemming tools that use a screw to alter the fold size, this attachment is machined for a specific final hem width. Before purchasing or installing, you must verify that the binder's width matches your product specification. If you need multiple hem widths, you will require a separate binder for each width, as swapping a fixed binder is faster than re-calibrating an adjustable one on a production line.
Technical Specifications and Material Construction
When evaluating this industrial sewing machine parts, the material and build quality directly correlate with lifespan and performance. The 5674-A is constructed from a metal alloy, consistent with industry standards for either stainless steel or chrome-plated carbon steel. The surface is polished to reduce friction and resist rust. This is a critical factor in humid factory environments or when sewing moisture-absorbent natural fibers.
- Weight: 65 grams. This lightweight design minimizes additional load on the presser foot bar and head, ensuring that the machine's automatic tension and feed mechanisms operate without strain.
- Finish: Polished metal. The smooth transition from the entry scroll to the needle area is designed to prevent fabric snagging and wrinkling.
- Compatibility: Designed for standard industrial lockstitch machines (e.g., Brother, Juki, Jack) and many home multi-function machines. It requires a standard presser foot holder or screw mounting.
- Width Range: Fixed width typically between 6mm and 12mm. Always verify the specific dimension of the unit you receive, as this determines the final hem allowance.
The "new" iteration of this model likely incorporates refinements to the entry angle or the curvature of the guide groove. These are the areas manufacturers adjust to reduce the difficulty of starting the seam—the moment when the fabric must first enter the scroll. While the exact geometry is verified through physical testing, the improvements generally focus on making the initial feed more intuitive for the operator.
Step-by-Step Installation Guide
Correct installation is the prerequisite for flawless stitching. A poorly attached binder will cause skipped stitches, uneven folds, or damage to the needle plate. Follow these steps carefully to secure the 5674-A to your machine.
Step 1: Verify Presser Foot Bar Compatibility
Before loosening any screws, check the configuration of your machine's presser foot bar. The binder attaches to the bar via a mounting hole or a clamp. Confirm that the diameter of your machine's presser foot bar matches the clamp of the 5674-A. Most industrial machines use a standard 14mm or 16mm bar, but home machines may differ. Attempting to force a mismatched attachment can strip threads or bend the mounting bracket.
Step 2: Remove the Standard Presser Foot
Raise the presser foot lever to the highest position. Remove the standard presser foot by loosening the thumb screw located on the presser foot bar. Slide the old foot off and set it aside. You will not use the standard foot while the binder is in place, as the binder itself acts as the guide and the fabric support platform.
Step 3: Mount the Binder Securely
Slide the shank of the 5674-A binder onto the presser foot bar. Position it so that the exit channel of the binder aligns with the needle's center line. The needle should pass through the center of the folded fabric that exits the binder, not to the left or right of it. Hand-tighten the mounting screw first, then use a screwdriver to tighten it firmly. Apply moderate force only—overtightening can compress the bar or strip the screw threads, permanently damaging the machine's sewing machine spare parts.
Step 4: Lower the Presser Foot and Check Alignment
Lower the presser foot lever. Visually inspect the gap between the bottom of the binder and the needle plate. The binder should sit flush with the plate or with a hair's breadth of clearance. If it presses too hard against the plate, it will scratch the plate and impede fabric feed. If it sits too high, the fabric will not be held firmly enough to fold correctly. Use the presser foot pressure adjustment knob on your machine to fine-tune this if necessary.
Step 5: Test with Scrap Fabric
Never start production without a test run. Use a piece of scrap fabric that matches the weight and stretch characteristics of your actual material. Run a few inches of fabric through the binder at a low speed. Check the fold consistency on both the top and bottom layers. If the fold is uneven, revisit Step 3 and adjust the horizontal alignment of the binder relative to the needle.
Operating Techniques: Feeding Fabric for a Perfect Fold
Once installed, the quality of your output depends on operator technique. The binder automates the fold, but the operator controls the feed rate, tension, and start-up procedure. The following methods are standard for achieving optimal results with the 5674-A.
Starting the Seam: The First 10 Centimeters
The most critical phase is the start. Insert the raw edge of the fabric into the wide entry of the scroll. Push it forward gently until you see the folded edge emerge from the exit channel near the needle. Lower the presser foot and take a few slow stitches. Use your left hand to guide the fabric into the scroll, and your right hand to gently hold the folded edge that has already passed the needle. This manual guidance is required for the first 5 to 10 centimeters. Once you see the fold is stable and the stitches are catching the folded edge consistently, you can release the manual guidance and rely on the machine's feed dogs to pull the fabric through.
Maintaining Consistent Speed and Tension
Once the seam is running, maintain a steady, moderate speed. Do not pull the fabric from the back of the machine. The feed dogs are designed to pull the fabric through at a specific rate. If you pull, you will stretch the fabric and distort the fold, especially on knits. Similarly, do not push the fabric into the binder faster than the feed dogs can take it. This will cause fabric to bunch up at the entry point of the scroll. Let the machine do the work; your role is to keep the fabric aligned with the entry of the binder.
Handling Corners and Curves
When you approach the end of a seam, or if you are sewing a continuous loop (like a cuff that is sewn shut before hemming), you will need to stop with the needle in the down position. Raise the presser foot, pivot the fabric, and lower the foot to continue. For cylindrical work, it is often easier to sew the hem before closing the side seam of the cuff. This allows you to sew a straight, flat piece of fabric rather than wrestling with a tube.
Suitable Machines and Fabric Types
The 5674-A is a versatile tool, but it has limitations based on machine type and fabric weight. Understanding these boundaries prevents frustration and material waste.
Machine Compatibility: Lockstitch, Overlock, and Coverstitch
This binder is primarily designed for standard industrial lockstitch machines. These are the most common machines in garment factories, used for assembly seams. The low profile of the binder and its mounting system are optimized for the flat bed of a lockstitch machine. It can also be used on some overlock machines (sergers) for specific binding operations, but the mounting hardware may require an adapter. It is generally not recommended for coverstitch machines, as these machines have a different feed mechanism and needle arrangement that makes binder alignment difficult.
Fabric Weight and Stretch Considerations
The fixed width of 6mm to 12mm makes this binder ideal for light to medium-weight fabrics. This includes typical shirting materials (poplin, oxford), T-shirt knits (jersey, pique), and light to medium denim. For heavy materials like thick canvas or upholstery fabrics, the fixed channel is too small to accommodate the bulk of the multiple folds, leading to jams. For highly elastic fabrics, the friction of the binder can cause stretching. If you must sew stretch fabrics, reduce the presser foot pressure and consider using a feed dog with finer teeth to minimize the pull on the bottom layer.
When using this on a serger, you are typically creating a rolled hem or a narrow binding. The technique differs slightly, as the binder must be positioned to feed the fabric into the knife and needle area simultaneously. Always test on scraps to ensure the binder does not obstruct the serger's cutting mechanism. This is where understanding your specific machine's geometry is crucial, as the position of the binder relative to the needle is more critical on an overlock machine than on a standard lockstitch machine.
Common Mistakes and How to Avoid Them
Even with correct installation, operators can encounter issues that lead to defective seams. The following list covers the most frequent problems observed on factory floors and the practical solutions to resolve them.
Problem: Uneven Fold Width on Top vs. Bottom Layer
Symptom: The top fold is wider than the bottom fold, or vice versa.
Cause: This is almost always an alignment issue. The binder is not square to the needle. If the exit channel is twisted even slightly, the fabric will fold asymmetrically.
Solution: Loosen the mounting screw and rotate the binder slightly until the exit channel is perfectly perpendicular to the direction of the fabric feed. Re-tighten and test again.
Problem: Fabric Jamming or Bunching at the Entry Point
Symptom: The fabric folds up and refuses to enter the scroll, or it enters but bunches up inside the channel.
Cause: This is commonly caused by a mismatch between the fabric weight and the binder width, or by a rough edge on the fabric. It can also occur if the operator is pushing the fabric faster than the feed dogs are pulling it.
Solution: Check the internal channel for burrs or rough spots. Polish with fine sandpaper (600-grit or higher) if necessary. Slow down the feed rate and ensure the fabric edge is cut cleanly, free of loose threads or frayed edges.
Problem: Skipped Stitches or Needle Breakage
Symptom: The needle misses the thread loop, creating gaps in the seam, or the needle hits the metal binder.
Cause: The needle is striking the binder because the alignment is off. This is a dangerous situation that can damage the needle bar and the hook timing.
Solution: Stop immediately. Check the alignment of the needle in the center of the binder channel. If the needle is hitting the side of the channel, loosen the binder and re-align it. If the needle is bent, replace it before attempting to sew again.
Problem: Fabric Stretching or Distortion on Knits
Symptom: The hem looks wavy or the fabric edge is stretched out of shape.
Cause: The friction of the binder is stretching the fabric as it is pulled through.
Solution: Reduce the presser foot pressure. This allows the fabric to feed more evenly between the top and bottom layers. You can also try a slightly smaller needle size to reduce the size of the hole being punched in the fabric.
Maintenance and Care for Longevity
Given that the 5674-A is a metal component exposed to constant friction, lint, and thread debris, regular maintenance is non-negotiable for consistent performance. A well-maintained binder will last for years, while a neglected one will cause defects and slow down production.
Daily Cleaning: Removing Lint and Debris
At the end of each shift, remove the binder from the machine. Use a small brush (like a toothbrush) or compressed air to remove lint and fabric fibers from the internal channel. This is critical, as lint buildup can change the effective internal dimensions of the channel, leading to inconsistent folds or jams. Do not use metal tools to scrape the channel, as this will scratch the polished surface.
Lubrication: Where and How Much
Apply a single drop of high-quality sewing machine oil to the moving parts of the binder. While the binder itself is mostly static, the guide channel benefits from a thin film of oil to reduce friction. Apply the oil to a soft cloth and wipe the inside of the channel. Do not over-oil, as excess oil can migrate to the fabric and cause oil stains that are difficult to remove. Oil the pivot points of any adjustable mechanisms, but avoid getting oil on the presser foot bar or the needle area.
Periodic Inspection for Wear
Check the binder periodically for signs of wear. The most common wear point is the entry scroll, where the fabric is forced to fold. Over time, this edge can become sharp or develop a burr, which will cut or fray the fabric. If you notice this, polish the edge with fine sandpaper. Also, check the mounting screw for signs of stripping. A stripped screw will not hold the binder securely, leading to alignment issues.
Selecting the Right Binder for Your Production Needs
Choosing the correct binder is about matching the tool to the specific task. The 5674-A is one option among many, and understanding its place in the market helps you make an informed decision.
Fixed Width vs. Adjustable Width
As discussed, the 5674-A is a fixed-width binder. For a factory that produces one style of cuff or hem consistently, this is ideal. It is simpler to use, less prone to operator error in adjustment, and often more robust because there are fewer moving parts. However, if your production runs involve frequent style changes with different hem widths, an adjustable binder may be more cost-effective. It requires more skill to set up, but it eliminates the need to purchase and store multiple fixed-width binders.
Evaluating Quality: Surface Finish and Material
When purchasing sewing machine parts, inspect the surface finish carefully. A high-quality binder will have a mirror-like polish on the internal surfaces that contact the fabric. This is not just for aesthetics; it is for function. Look at the edges of the scroll. They should be smooth and rounded, not sharp. The material should be dense and heavy for its size, indicating solid metal rather than a thin stamping. This is particularly important when sourcing from a China sewing parts supplier, where quality can vary significantly between manufacturers. Reputable manufacturers use stainless steel or high-grade carbon steel with a durable chrome plating.
Brand Considerations
In the market for presser foot and binder attachments, there is a distinction between original equipment manufacturer (OEM) parts and aftermarket parts. The PL brand is recognized as a manufacturer of high-quality presser foot and other sewing machine accessories. Their products are designed to meet or exceed OEM specifications, offering a reliable alternative to branded machine parts. When selecting a supplier, look for one that provides specific technical details about the materials and manufacturing processes used, as this indicates a commitment to quality control.
Practical Tips for Production Efficiency
Beyond the basic installation and use, there are several workshop-level tips that can help you integrate the 5674-A into your production line more effectively. These are the nuances that separate a competent operator from a highly efficient one.
Optimizing the Workstation Layout
Arrange the work table so that the fabric stack is on the left side of the machine, within easy reach of the operator's left hand. The finished garment pieces should be stacked on the right. This minimizes the motion required for each piece, reducing fatigue and increasing throughput. Ensure the table surface is smooth to allow fabric to slide easily.
Thread and Tension Adjustments
When switching to a binder operation, you may need to adjust the thread tension. Because the binder creates a thicker, multi-layer fold, the needle thread must be tight enough to pull the bobbin thread up into the center of the fabric layers, creating a balanced stitch. Test on a scrap piece and adjust the top tension dial incrementally until the stitch looks identical on both the top and bottom of the fabric.
Training New Operators
Do not assume that an experienced seamstress can immediately operate a binder. The technique for feeding the fabric into the scroll is unique. Set aside time for training, and have new operators practice on scrap fabric until they can produce 10 consecutive flawless pieces before moving to production. This investment in training pays off in reduced defect rates and less material waste.
Conclusion: A Small Investment with a Significant Operational Impact
The PL cuff binder attachment (5674-A) is a prime example of how a specialized piece of industrial sewing machine parts can solve a specific production challenge. By automating the folding process, it eliminates the variability of manual hemming, increases output speed, and allows factories to maintain consistent quality across large production runs. Its lightweight design and compatibility with standard industrial lockstitch machines make it an accessible upgrade for most garment manufacturing facilities.
Success with this binder relies on three key factors: precise installation, correct operator technique, and consistent maintenance. By following the installation steps and operating guidelines outlined in this article, your technicians can quickly master this attachment. The result is a cleaner, faster, and more reliable cuff hemming process, contributing directly to the overall efficiency of your sewing floor.
Need this part for your workshop?
Get a Free Quote on WhatsApp: +86 137 3825 6697Browse the full catalog at pinseam.com · Free 2026 full catalog (PDF) · Related guide: magnetic seam guide
PL (Professional Leader) supplies sewing machine parts for industrial lockstitch, overlock and interlock machines, including the industrial presser foot range, needle plates, feed dogs and related presser foot accessories.
Edited by the technical team at PL (Professional Leader) — high-quality sewing machine accessories from China. About our factory | Catalog: pinseam.com | WhatsApp: +86 137 3825 6697
📢 New arrivals & factory updates on Telegram — join our channel: t.me/plsewingparts
Explore Our Parts Guides
- sewing machine accessories, needle threaders & thread guides
- industrial & magnetic seam guides
- presser foot guide: types & compatibility
- industrial presser feet for factory lines
- roller & rolled hemmer presser feet
- industrial sewing machine parts & spare parts
- wholesale sewing machine parts, factory direct
- about PL (Professional Leader)
Questions about a specific part? Chat with us on WhatsApp +86 137 3825 6697 — factory direct, reply within hours.


Comments
Post a Comment