32mm-10mm Three-Fold Binder Presser Foot Guide for Industrial Sewing
32mm-10mm Three-Fold Binder Presser Foot Guide for Industrial Sewing
Garment factories running binding operations for T-shirts, underwear, or home textile products often struggle with inconsistent fold widths and slow manual preparation. The 32mm-10mm three-fold binder (also called a three-fold hemming tube or three-fold tape folder) solves this problem by converting a wide fabric strip directly into a finished 10mm binding tape in a single pass. This article explains how this sewing machine attachment works, how to install it correctly on a lockstitch machine, and how to avoid the common mistakes that cause skipped stitches, twisted tape, or uneven edges.
Related guide: presser foot — types, fitting and machine compatibility.
What Problem Does This Sewing Machine Part Solve
Manual binding requires the operator to fold, press, and secure the fabric strip before stitching. This process is slow, inconsistent, and heavily dependent on operator skill. The three-fold binder replaces the manual operation with a metal forming channel that folds the fabric three times as it feeds toward the needle.
The result is a uniform, clean, and visually consistent edge on every piece. For production managers, this sewing machine accessory directly reduces labor minutes per unit and eliminates the bottleneck that manual folding creates on the sewing line.
"32mm-10mm" refers to two critical dimensions: the maximum fabric strip width at the inlet is 32mm, and the finished binding width at the outlet is 10mm. If your factory sews binding wider or narrower than 10mm, this specific model is not suitable for your application.
How the Three-Fold Binder Mechanism Works
"Three-fold" describes what happens to the fabric inside the binder. The raw edges of the strip are folded inward twice, and then the entire strip is folded once more around the garment edge. This creates a clean, fully enclosed binding with no raw edges exposed on either side of the seam.
Inside the binder body, an S-shaped channel guides the fabric through these folds. The channel geometry is the most critical part of the design. If the internal curves are too sharp or have rough spots, the fabric will jam, pucker, or fail to advance.
This binder is made of all-steel construction with a chrome-plated or polished finish. The steel construction serves two purposes: it resists the abrasion of synthetic fibers and maintains its shape under the vibration of high-speed stitching. A binder that bends during operation will produce inconsistent fold widths.
The forming channel tapers gradually from the 32mm inlet to the 10mm outlet. This progressive narrowing allows the fabric to fold smoothly without distortion. Attempting to feed a strip wider than 32mm into this binder will cause a blockage at the inlet.
All-Steel Construction and Surface Finish
Industrial sewing machine parts that handle fabric continuously must withstand constant wear. The three-fold binder is no exception. The steel body is heat-treated to increase surface hardness, which resists the scraping effect of synthetic sewing thread and tightly woven fabrics.
The chrome-plated or polished surface reduces friction between the fabric and the channel walls. This is especially important when sewing lightweight fabrics such as silk or polyester chiffon, which tend to generate static cling and slide poorly on rougher surfaces.
The internal S-shaped channel is formed through precision bending and laser welding. These manufacturing methods ensure smooth, burr-free internal walls that will not snag fine yarns. A binder with rough internal edges will cause fabric pilling, thread breakage, or uneven feeding.
One practical drawback of all-steel construction is weight. A steel binder is heavier than aluminum or plastic alternatives. In a fixed installation, this extra weight is usually not a problem, but if mounted on a quick-release adapter on machines that change operations frequently, it may affect balance.
Step-by-Step Installation on an Industrial Lockstitch Machine
Correct installation determines whether the binder runs smoothly or produces skewed seams and damaged fabric. The following steps apply to standard industrial single-needle lockstitch machines from major manufacturers. Confirm your machine type before starting.
Step 1: Mount the Bracket to the Presser Foot Bar
Loosen the screw on the mounting bracket and slide the bracket onto the presser foot bar, positioning it to the left of the needle. Do not fully tighten the screw yet. The bracket must be able to slide vertically and rotate slightly for the alignment steps that follow.
Make sure the bracket does not interfere with the presser foot lifting mechanism. Raise and lower the presser foot using the knee lifter and confirm that the bracket moves freely without catching on the machine head.
Step 2: Align the Binder Outlet with the Needle Drop Point
The center of the binder outlet must align with the needle drop point. The allowable tolerance is less than 1mm. If the outlet is offset, the needle will penetrate off-center through the binding tape, producing a seam that is visible on the face of the garment.
To check alignment, lower the needle manually to its lowest position. Visually compare the needle position with the center of the binder outlet channel. Adjust the bracket position horizontally until the two align.
This step is the most common source of installation errors. Operators who skip precise alignment frequently report that the binding "pulls to one side" or that the seam is not centered on the folded edge.
Step 3: Set the Vertical Clearance Between the Binder and the Needle Plate
The bottom surface of the binder outlet should sit 0.5mm to 1mm above the needle plate. Use a feeler gauge or thin cardboard to check this clearance. If the gap is too small, the fabric cannot feed smoothly. If the gap is too large, the fabric will flutter and cause uneven stitches.
Tighten the bracket screws once the vertical clearance is correct. Recheck the horizontal alignment after tightening, because the tightening action may shift the bracket position slightly.
Step 4: Select a Compatible Presser Foot
A standard wide presser foot will not work correctly with a three-fold binder. The wide foot covers the binder outlet and prevents the folded fabric from being pressed flat against the needle plate. Use a single-edge presser foot or a dedicated binding presser foot with a guide groove on the bottom surface.
A grooved presser foot helps hold the folded binding tape in position as it approaches the needle. This is especially important when sewing curves, where the binding tape tends to shift laterally.
Step 5: Thread the Fabric Strip Through the Binder
Cut a fabric strip no wider than 32mm. For initial setup, use a bias-cut strip (cut at a 45-degree angle to the fabric grain) for maximum flexibility. Straight-grain strips are stiffer and more difficult to pull through the channel.
Insert the strip into the binder inlet. Use a threading wire or a long, thin screwdriver to push the fabric through the S-shaped channel. Pull the fabric from the outlet until approximately 5cm extends past the binder mouth.
Do not pull the fabric while the presser foot is down. The fabric must be properly positioned under the presser foot before you lower it and begin sewing.
Step 6: Test Run at Low Speed
Lower the presser foot onto the fabric strip. Start the machine at low speed and guide the fabric tail gently with your left hand. The binder should fold the fabric automatically as it feeds. Let at least 20cm of fabric pass through before evaluating the result.
Check the folded binding tape for uniform width, clean edges, and correct stitch placement. If the fabric puckers or folds unevenly, stop and recheck the binder alignment and presser foot selection.
Compatible Machine Types and Fabric Types
This three-fold binder is designed primarily for industrial single-needle lockstitch machines. This is the most common sewing machine type in garment factories, used for joining, hemming, and topstitching operations. The binder mounts on the presser foot bar, which is present on all standard models.
Some factories use this binder on overlock machines (sergers) to feed binding tape. This is only feasible if the overlock machine has a compatible mounting point and sufficient space around the needle area. Overlock machines have different needle plate and feed dog configurations, so confirm compatibility before purchasing.
Coverstitch machines are generally not suitable for this binder. The needle arrangement and looper system on a coverstitch machine make it difficult to position the binder without interfering with the stitch path.
Fabric Recommendations
This binder works best with bias-cut, light to medium-weight fabrics. Suitable materials include cotton, linen, silk, polyester, and rayon blends. The 32mm inlet width provides enough folding room for these fabrics without excessive compression.
For highly elastic fabrics such as spandex or high-recovery knits, the binder may stretch the fabric as it pulls it through the channel. If sewing these materials, consider using the binder with a Teflon-coated presser foot or a silicone feed roller to reduce drag.
Heavyweight fabrics over 12 ounces, such as denim or canvas, may exceed the forming capacity of this binder. The internal channel is designed for thinner materials, and forcing heavyweight fabric through will cause jamming or permanent deformation of the binder body.
When sewing smooth fabrics such as satin or chiffon, reduce machine speed for the first few centimeters before the fabric fully enters the feed dog. Smooth materials tend to slide sideways if the binder is not perfectly aligned.
Common Mistakes and How to Prevent Them
Even experienced sewing technicians encounter problems when setting up a three-fold binder for the first time. The following issues account for the majority of workshop troubleshooting calls.
Mistake 1: Poor Alignment Between the Binder Outlet and the Needle
The most common error is failing to align the binder outlet with the needle drop point. This causes the seam to sit off-center on the binding tape, making the finished edge look skewed. For garments with contrast-color binding, this defect is immediately visible and unacceptable to quality control.
Prevention is straightforward: perform the alignment check every time you install the binder, not just the first time. Bracket screws can loosen after weeks of vibration, so periodic checks are recommended.
Mistake 2: Using the Wrong Presser Foot
Standard presser feet are too wide for binding operations. They cover the binder outlet and prevent the operator from seeing the folded fabric as it approaches the needle. The result is poor stitch placement and difficulty guiding curves.
Switch to a single-edge presser foot or a grooved binding presser foot. This simple change often resolves feeding problems that appear to originate from the binder itself.
Mistake 3: Incorrect Clearance Between the Binder and the Needle Plate
Too little clearance restricts fabric flow and causes the binder to scrape against the needle plate. Too much clearance allows the fabric to lift and flutter, producing uneven stitch lengths and poor fold formation.
Use a feeler gauge to set the clearance at 0.5-1mm. Check this setting after any maintenance that involves removing or reinstalling the needle plate.
Mistake 4: Forcing the Fabric Through the Binder
Operators who pull the fabric forcefully through the binder during setup may stretch the fabric or damage the internal channel. The binder is designed to guide the fabric with minimal resistance. If the fabric does not slide through easily, stop and check for obstructions or alignment issues rather than pulling harder.
For stiff fabrics, apply a silicone-based fabric lubricant to the strip before threading. This reduces friction without leaving residue that could affect subsequent sewing or finishing operations.
Mistake 5: Skipping the Bias Cut
Straight-grain strips do not fold as cleanly as bias-cut strips. The binder will force the fold, but the result is often a stiff, bulky edge that will not lie flat. Bias cutting allows the fabric to stretch slightly around curves, producing a smoother finished edge.
For straight-grain applications, consider a different binder design or accept that the finished edge will have less flexibility.
Maintenance and Cleaning for Extended Service Life
Like all industrial sewing machine parts, the three-fold binder requires regular cleaning to maintain performance. Over time, fabric lint and thread fragments accumulate inside the S-shaped channel, increasing friction and eventually causing the fabric to stick or jam.
Clean the binder once a week, or more frequently if sewing plush fabrics such as fleece or brushed cotton. Use compressed air to blow out the channel from the inlet side. For stubborn residue, soak the binder in a mild solvent and dry it thoroughly before reinstalling.
Do not use abrasive cleaners or metal brushes on the channel walls. Scratching the polished surface creates rough spots that snag fabric and defeats the purpose of the chrome finish.
Inspect the binder regularly for signs of wear. Look for scratches inside the channel, a bent mounting bracket, or corrosion on the surface. A binder that has been dropped on a concrete floor may have internal damage that is not visible from the outside. If the binder fails to produce clean folds after correct installation, replace it rather than attempting to repair the internal geometry.
When the binder is not in use, store it in a dry location with a thin coat of machine oil on the exterior surfaces. This prevents rust, especially in humid factory environments.
Practical Selection Advice for Factory Managers and Parts Buyers
When purchasing sewing machine parts for binding operations, consider the entire production environment, not just the binder itself. The following factors determine whether a particular binder will perform well in your factory.
Match the Binder Size to the Finished Binding Width
The 10mm outlet width of this binder is fixed. If your product specification calls for a 12mm finished binding, this binder will not produce the correct result. Measure the finished binding width on your current products and select a binder with a matching outlet size.
Keep in mind that the finished binding width is approximately one-third of the original strip width, accounting for the two internal folds. A 32mm strip produces a 10mm binding, so a 12mm binding requires a 36mm strip.
Confirm Compatibility with Your Sewing Machine Brand
Most three-fold binders use a universal mounting bracket that fits standard presser foot bars. However, some machine brands have non-standard bar diameters or special presser foot lifting mechanisms. Before ordering, measure your presser foot bar diameter and compare it with the bracket specifications.
Major machine brands including Brother, Juki, and Jack are generally compatible with this type of binder. If using a less common brand, request a dimension drawing from the supplier to confirm the fit.
Consider Operator Skill Level
The three-fold binder requires a short learning curve. Even experienced operators need time to develop the muscle memory for guiding fabric into the binder and managing the start of each seam. Plan for several hours of training per operator when introducing this sewing machine attachment to the production line.
Factories with high operator turnover should use photographs to document the installation and threading procedure. This reduces the training burden and ensures consistency when new employees join the team.
Order Spare Binders for Critical Production Lines
If the binding operation is on the critical path of your production schedule, keep a spare binder in stock. A damaged binder will stop the entire line, and waiting for a replacement from a sewing machine parts supplier can take days depending on the shipping route. A spare unit minimizes downtime and allows the damaged unit to be repaired or replaced without pressure.
When ordering from Chinese sewing parts suppliers, specify the exact model and dimensions. PL 5818-A is one example of a 32mm-10mm three-fold binder, but similar products from other presser foot manufacturers may have slightly different mounting configurations. Confirm the mounting bracket design matches your existing setup before purchasing.
Cost Considerations and Return on Investment
Industrial sewing machine parts such as the three-fold binder are relatively low-cost items compared to the sewing machine itself. The economic justification for purchasing this attachment is based on labor savings and quality improvement, not on the part price.
A factory that previously assigned one operator to manually fold and press binding tape can reassign that operator to other tasks after installing the binder on the sewing line. The labor savings typically pay back the binder cost within the first few production runs.
The quality improvement is harder to quantify but equally important. Consistent binding width reduces rework and customer returns. In garment manufacturing, visible binding defects on necklines or armholes are a common cause of garment rejection, and the binder pays for itself by reducing the defect rate.
Other Binder Types and When to Use Them
The three-fold binder described in this article is one of several binding attachments available for industrial sewing machines. Understanding the alternatives helps you select the correct sewing machine part for each application.
A two-fold binder (also called a single-fold binder) folds the fabric edge only once before stitching it to the garment. This produces a simpler edge finish suitable for hems or decorative piping where a fully enclosed binding is not required. Two-fold binders are lighter than three-fold versions and easier to thread.
A tape binder is designed specifically for pre-made bias tape rather than raw fabric strips. The tape binder folds the tape around the fabric edge in a single operation. This is faster than using a three-fold binder with raw fabric, but requires purchasing or producing the tape separately.
Adjustable binders allow the operator to change the finished binding width by adjusting screws on the binder body. These are more versatile but also more expensive and more prone to misalignment than fixed-size binders.
For factories sewing multiple binding widths, stocking several fixed-size binders is often more practical than relying on one adjustable unit. Fixed-size binders are cheaper, easier to set up, and less likely to drift out of adjustment during production.
Summary of Key Setup Parameters
The following checklist summarizes the critical settings for the 32mm-10mm three-fold binder on an industrial lockstitch machine. Use it as a quick reference when installing the binder or troubleshooting binding quality issues.
- Binder outlet center aligned with the needle drop point, within 1mm tolerance.
- Vertical clearance between the binder outlet bottom and the needle plate surface: 0.5mm to 1mm.
- Presser foot type: single-edge presser foot or grooved binding presser foot. Standard wide presser feet are not suitable.
- Fabric strip width: maximum 32mm at the inlet. Bias-cut strips feed more smoothly than straight-grain strips.
- Machine speed: start at low speed for the first 5cm of the seam, then increase to production speed.
- Lubrication: use silicone spray on stiff fabrics to reduce friction through the channel.
- Cleaning: blow out lint from the channel weekly with compressed air, more often for plush fabrics.
Following these parameters will produce clean, uniform binding at production speeds. The three-fold binder is a proven tool for improving edge quality and reducing labor in garment manufacturing. Correct installation and regular maintenance are the two factors that determine whether this sewing machine attachment reaches its full potential in your factory.
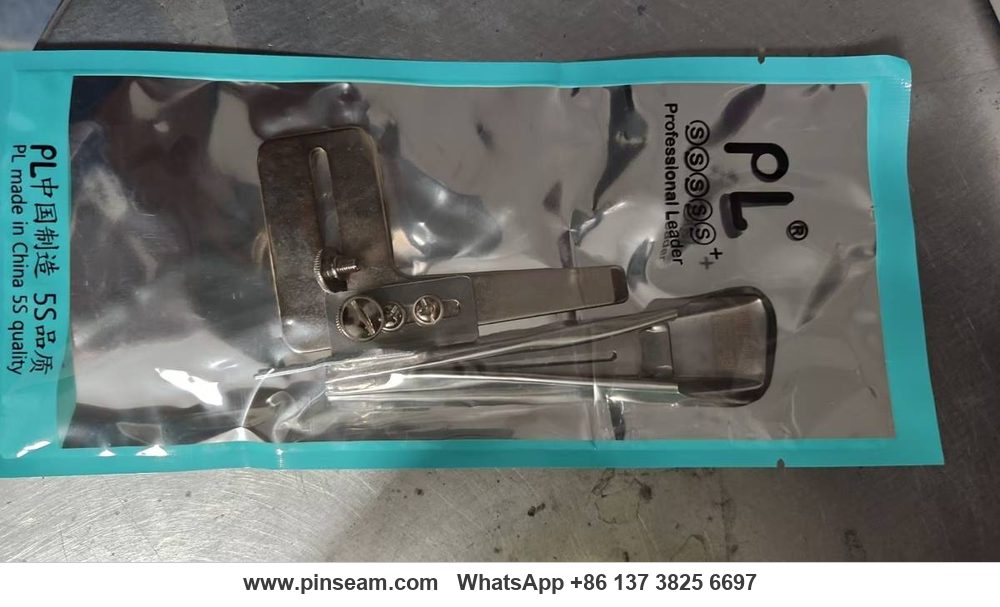
When evaluating suppliers for this type of sewing machine part, request a sample and test it on your actual production machine before committing to a bulk order. Internal channel quality is difficult to assess from photographs, and only a test run will reveal whether the binder produces smooth, consistent folds with your specific fabrics.
The PL 5818-A three-fold binder is one option in this category. As with any presser foot attachment, the final choice should be based on measured performance in your factory, not on brand reputation alone. The binder that produces clean folds at your required speed, with your fabric types, on your machine models is the right choice, regardless of the manufacturer.
For parts buyers managing inventory, standardizing on one binder model across all production lines simplifies spare parts management and operator training. If your factory has multiple machine brands, confirm that the mounting bracket fits all machines before standardizing on a single model.
Need this part for your workshop?
Get a Free Quote on WhatsApp: +86 137 3825 6697Browse the full catalog at pinseam.com · Free 2026 full catalog (PDF) · Related guide: presser foot
PL (Professional Leader) supplies sewing machine parts for industrial lockstitch, overlock and interlock machines, including the industrial presser foot range, needle plates, feed dogs and related presser foot accessories.
Edited by the technical team at PL (Professional Leader) — high-quality sewing machine accessories from China. About our factory | Catalog: pinseam.com | WhatsApp: +86 137 3825 6697
📢 New arrivals & factory updates on Telegram — join our channel: t.me/plsewingparts
Explore Our Parts Guides
- sewing machine accessories, needle threaders & thread guides
- industrial & magnetic seam guides
- presser foot guide: types & compatibility
- industrial presser feet for factory lines
- roller & rolled hemmer presser feet
- industrial sewing machine parts & spare parts
- wholesale sewing machine parts, factory direct
- about PL (Professional Leader)
Questions about a specific part? Chat with us on WhatsApp +86 137 3825 6697 — factory direct, reply within hours.


Comments
Post a Comment